It really wasn't until the seller accepted our offer and we were well into the buying process that I had the idea to rent the house out for game day weekends, graduations, etc. I liked the idea of having a little "home away from home" that we could use for Bunko, bible studies, coffee, etc. And the idea of renting to college students for a year at a time did not appeal to me! So we decided to furnish it and rent it out fully furnished. I opened a business account and then the real fun began! Because I needed to furnish and decorate this house on a pretty tight budget, my motto was "yard, sale, thrift store, or free." It's amazing how creative you can be when you're trying to stick to a budget. Except for the sofa and beds (mattresses), everything was either purchased at a yard sale, purchased from a thrift store, pulled from my attic, or pulled off the side of the road!
So now it's time for the offcial house tour, with side-bits of information along the way! Enjoy!
This is the foyer. I love the arch doorway, and I love that it's right there as soon as you walk in the front door!
I stenciled the foyer with a cute stencil that I purchased from Hobby Lobby. As the decor of the house began to emerge, I decided to add a little bling to the stencil and used gold thumb tacks from the dollar tree at each crosspoint.


The picture below is a picture of the living room, just beyond the foyer. The pillow on the sofa was one of my first purchases. At $105, I'd definitely consider it a splurge for this house. But because I had saved so much by shopping at yard sales and thrift stores, I justified the splurge.


 The pillow is actually animal hide and it is SO COOL! LOVE this pillow! Purchased it at Moxii in Auburn. You must check them out! The art above the sofa was another DIY project. You can read more about it HERE.
  The coffee table was a quick and easy DIY project. I knew I wanted a chevron pattern somewhere in the house, so when I found a coffee table with a very plain and flat surface, I snatched it up! Not only did I love the flat surface, but I also loved the brass caps on the legs.
The chair below was a $40 purchase at the thrift store. It's kind of funny because I really did not want to pay for $40 for this chair. My original plan was to paint it a high-gloss aqua, but when I brought it home, my husband REALLY liked it and thought it would be a mistake to paint it. It eventually grew me and I decided not to paint it. The fabric on the chair really helps add a certain flair to the whole room. You can't tell from the pictures, but the brown on the fabric is velvet. So glad that I decided to splurge on the $40 chair!


The bar cart was a side-of-the -road save! It was just the metal part, but I had Home Depot cut some plywood for me and I had the glass shop cut a $10 glass piece for me that I put on the top shelf only. I cut some hounds tooth fabric and placed it on the plywood pieces. The lamp was from the Goodwill, and the lamp shade was also a DIY. I used a paper napkin from Hobby Lobby and mod-podged it all the way around the shade. I think I used three napkins, and I had to cut and piece them together so that the design would match up, but it was a really quick, easy, and inexpensive project with huge impact. This is the second time that I've used a napkin and Mod-Podge to cover a lamp shade. If you'd like a tutorial, click HERE.

The little table below was a $3.00 thrift store purchase that I quickly spray painted aqua. It was the perfect size and the perfect price! The print right above it was a freebie from Danielle Oakey. The mirrored frame was a $2.00 purchase from a yard sale.
 The book shelf was one that I already had. It was actually painted cow print from my son's barn-themed room 10 years ago. I found some great looking aqua crocodile wrapping paper at TJMaxx. I purchased a large piece of foam board from Hobby Lobby, cut it the size of the back of my book shelf, sprayed it with adhesive and adhered the wrapping paper to the foam board. I stapled the foam board to the back of the bookshelf and BAM! Prest-O Change-O! The art above the bookshelf was also a free DIY project that you can read about HERE.
The TV console was a $15 purchase that I snatched up REALLY QUICKLY from the Salvation Army. It was exactly what I had in mind, and for $15, it was even better than what I had in mind. You won't believe the BEFORE pics. Click HERE to see its transformation. The mirrors were from TJMaxx. The dog was $7.00 from Ross. The vases were Target clearance (MAJOR clearance), and the white lacquered croc box was from Ross. The chairs were from the thrift store. I spray painted them gold and reupholstered the seats.

 The bubble gum machine was an afterthought. I didn't bring it over til the day before Open House. It was collecting dust in the corner of my house, so I decided to bring out the spray paint and give it a little transformation. The goldfish added the right splash of color that I needed!
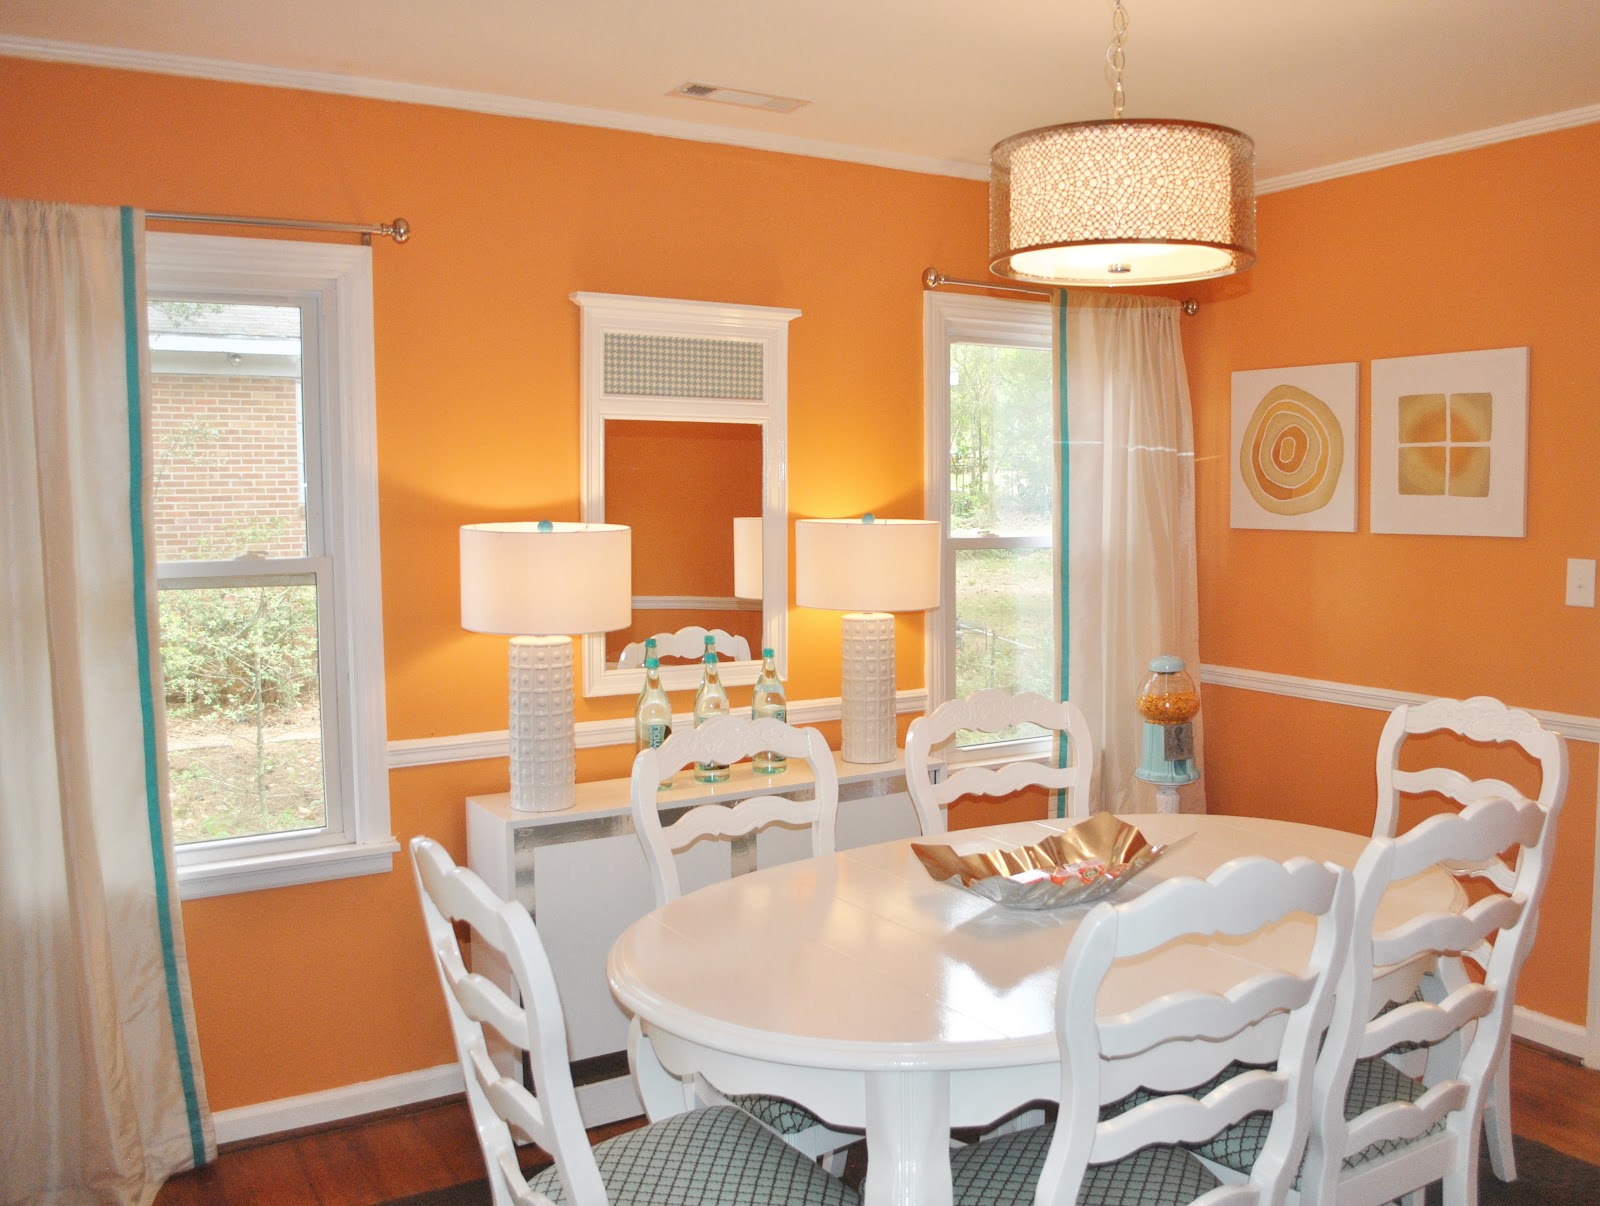
 This is a view of the kitchen from the dining room. The rug was an $8.00 (!!!) score from Fred's. Yes, Fred's. I was getting tired of all the bright color, so a white kitchen seemed like a good idea, plus the splash of color really pops against the white.
The little curtains were actually tea towels from Target. $2.99 for both! Yippee!

 The printables were freebies. I typed in "FREE KITCHEN PRINTABLES" on Pinterest, and all sorts of goodies popped up on the screen! The large frames were from the Dollar Spot at Target. The smaller frames were also from Target, but they weren't a dollar.
 The bulletin boards were another quick and easy DIY project that had a huge impact on the white kitchen. The bulletin boards were 50 cent yard sale purchases that were personalized with someone else's name. Perfect! I covered them with fabric from JoAnns and added a little aqua ribbon left over from my curtain project in the dining room. My eight year old added the felt aqua flower!
 I painted stripes in the hallway. A total time killer, but so very worth it! I also framed my AC thermostat (thanks , Pinterest, for the cute idea!)
 I painted the hall bath a pale blue, which is a nice soft contrast against the more harsh stripes in the hall. An orange bath mat and two orange towels help tie it all together. I opted for just a plain ole white shower curtain because the stripes in the hall were busy enough!
 Once again, Pinterest to the rescue. This time I typed "FREE BATHROOM PRINTABLES". I framed them in white Target frames. That little rubber ducky was one of my favorite purchases. I didn't know there was a blue and orange rubber duck in existence! It was ONE DOLLAR from the Dollar Tree.

 The Kid's Room is one of my faves! It makes me happy! For one thing, it was a REALLY inexpensive bedroom. I already had the bed frames and coverlets. I scored the beds about 12 years ago from a yard sale. $25 for both! They've been painted every color under the sun, but I think I like them best in the plain gloss white. The orange furry pillows were from Homegoods. They look like they were made from a bath mat! The cool orange lamp was a Homegoods clearance purchase. The orange cross was a 50 cent thrift store purchase. The bedside table was from a yard sale (of course I sprayed it orange and used Hobby Lobby half-price knobs). I made the flags from leftover fabric and a couple of bandannas. The vintage Auburn felt hat on the bed was a $2.00 purchase from the thrift sore. About a dozen people offered to buy it during the Open House. It reminded everyone of the 70"s childhood! Again, I took advantage of the "Free Printables" via Pinterest.
  I so wish I had a BEFORE pic of this dresser! It was really bad! I sanded it, filled holes, and sanded some more. Then primed it, painted it, and added those lovely knobs. I originally painted the top white, as well. But painting it orange (from the coffee table chevron project) was the right choice! And can you believe I found an aqua and orange tassel?!
  This picture is out of order and for some reason I'm having a hard time moving it. But it's a little niche in the hallway. I adore it! :) Trophy from thrift shop with Dollar Tree pencils. The bird is from the Target Dollar Spot. The little painting I sacrificed from my own house. :(
 This bedroom just kind of evolved, but I'm pleased with the end result. I painted the bedroom white before I even knew what I was going to do with it. I had a hard time finding something that I liked. I finally found that blue velvet chair at the thrift store for $40. It was in EXCELLENT condition, and it became my starting point. I found a set of six blue curtains at the thrift store ($3 per panel). I used one of them to cover a DIY headboard. I added white grosgrain ribbon to the headboard and to the curtain panels. Amd just an FYI - the sunburst mirror was only $34 from Home Depot (martha Stewart). It only comes in gold, but I sprayed this one silver. Loved the price tag on this mirror!
 I like this little corner. The LOVE art was super easy and inexpensive. I used a can of silver spray paint to spray paint chipboard letters from Hobby Lobby, then I just used a glue gun to adhere them to a plain white canvas. EZ! The mirror was from my attic (sprayed the frame silver) and the shelf was from the playhouse outside! The silver tray on the wall was from the thrift, and the orange balls were clearance (50 cents) Halloween Target items. I'm not sure I'm going to keep them there. They look kind of puny. The lamp was in my attic but I had to purchase the shade (Lowe's). The white pillow was from Target. The silver box and over sized jacks were both from Ross.
 These curtains were fun! After I added the white ribbon, I decided to try something that I thought about while I was pushing in the 1200 tacks in the foyer! I had seen some studded trim at my sister's house, and I so wanted some studded trim!! So i used regular thumb tacks (silver) from the Dollar Tree (300 for $1!) and pushed them through the ribbon. Each tack is one iPhone width apart. :) After I pushed the tack through, I used a hammer to gently bend the pointy part of the tack. It bent and kind of clamped down so it is securely attached. I wish I had a picture of the underside for you. This would have looked great with gold thumb tacks, but I already had the silver thing going on in the room. But really, the possibilities are endless. I'll be using this idea again!
 The dresser was given to me by a sweet friend. It had been in her garage collecting dust, so I took it off her hands. I cleaned it up a bit, primed it, painted it, added new knobs. LOVE how it turned out so crisp and clean.
  Last but not least...the MASTER BEDROOM. I tried to make it a little more sophisticated than the rest of the house. The same friend who gave me the dresser from the previous room also GAVE(as in FREE) me this armoire. The books, picnic basket, globe, and metal stool were all thrift store purchases. The little oil painting was a $4.00 clearance purchase from Kirklands. The AU are cardboard letters from Hobby Lobby.
 Believe it or not, those cool geometric orange and brown window treatments were also a thrift store score. In fact, I think I bought those early-on and decided to do the room around these curtains. The lamps were from Homegoods, the quilt from TJMaxx (clearance). The painting above the bed was a major Kirkland's clearance item. It was only $40!
 The Master Bedroom has it's own bathroom. It's small, but it works! I had originally pinned the picture below and asked my husband to "help me make it like the picture". I was pretty impressed with his skills!!
So that just about covers it! Let me know if you have any questions. And if you're interested in renting it, click HERE.
I'm linking to Frugal Fridays The Shabby Nest
and to the DIY Project Parade at the DIY Showoff
Love this!! I just jumped over from homestoriesatoz and wow this is beautiful. I have always loved orange and it looks so great with the blues! Nicely done.
ReplyDeleteThank you so much! Glad you enjoyed!
DeleteThank you so much! Glad you enjoyed!
DeleteI think this is an amazing job you did!! So fun, and hopefully a very lucrative prospect as well. Fantastic!
ReplyDeleteThank you!! Glad you enjoyed!
DeleteI think this all looks great! I love all the bright, cheery colors. You did an amazing job.
ReplyDeleteLOVE! As a die hard U of Alabama fan....I probably shouldn't say that..haha! BUT I do LOVE it! Every detail is just perfect and you did an amazing job. I am currently making over my powder room in tangerine and teal (I have to keep telling my Bama husband that it's tangerine not orange..lol) and I adore the color combination. So glad that Beth shared your house tour with us. :)
ReplyDeleteHeather
Heather..don't tell ...but I graduated from Alabama and my husband graduated from Georgia! We live in Auburn, though, and have fallen in love with the town and the University. So War Eagle AND Roll tide! :)
Deletefollow over here from AtoZ.
ReplyDeleteLOVE your house. just gorgeous!
cheryl xox.
Thanks so much! Glad you enjoyed!
DeleteWOW this looks amazing! I really love the diy wall art. You made it look expensive ;)
ReplyDeleteThank you! I can't take credit for the idea of the wall art (thanks, Pinterest!), I guess I can take credit for actually doing it and doing it in the brighter colors.
DeleteWow! This is amazing and sooo inspiring!!! LOVE IT! I love using free printables too...I have them all over my house!!
ReplyDeleteThank you so much!
DeleteLovely home tour and refreshing color combo! Loved it! Thanks for sharing :)
ReplyDeletexo Lynda
Thank you so much! Glad you enjoyed!
DeleteI love the orange and blue color combo! My son's room is orange and aqua. The stripes are fabulous!
ReplyDeleteThank you! I'll be checking your blog to see pics of your son's room!
DeleteTiffany, you are so talented! I am so impressed with all your cool DIY projects and thrift store finds! You make it look so easy to create something with not a lot of $$. Job well done my friend!!! I have no doubt you will have any problems renting it out and get lots of pleasure having all kinds of fun functions there. I think you have found your calling, you probably already knew that though. Can't wait to see it sometime in person!
ReplyDeleteYou're so sweet, Kathryn! Thank you!!
DeleteThis is such a fun place - I want to stay there!
ReplyDeleteFantastic job with the decor choices - so young, fun, and chic! BTW - what's the name of that orange paint color? I'm feeling inspired for some orange now!
Rhonda @ home.made.
I think you pulled off adding the orange throughout the house! You did it in a such a nice way. I love it;)
ReplyDeleteYes, you can definitely say there's orange throughout the house! :) Thank you!
DeleteUnbelievable. I grew up next door to a bright gloss orange house in Champaign IL home of the Fighting Illini. It truly was so orange that if someone asked us where we lived we said "in the white house next door to the orange house" and they knew exactly where it was. Then I moved to Denver 35 years ago where they live and breath orange and blue. LOL I never could have imagined doing something so pretty and tasteful in those colors. You are so talented! It was a pleasure to see all of your work. Thanks for sharing it!
ReplyDeleteWow! Thanks for the compliments. Your probably sick of ornage and blue by now! :)
DeleteWow, your orange and blue color scheme is SO FUN! Great job!
ReplyDeleteThis belongs in a magazine. I love everything! The gumball machine is my favorite. I loved it so much, I gave it a shout-out on my FB page/
ReplyDeleteHey! Can you tell me what color the orange is in the foyer that was used for the stencil? Thanks!
ReplyDeleteTiffany - this is awesome! What a fun idea and I love how you're using it as a rental for occasions. All of your attention to detail is amazing! I love everything about it! Great job, girl! {including a link back in this week's highlights!}
ReplyDeleteThanks so much for sharing the story and all of the details!
Tiffany,
ReplyDeleteSeriously?! I am stunned! You are a thrift shop decorating diva extraordinaire!
Anyone lucky enough to rent this house will have a fabulous time - it's so fun and creative!
Love the push pins in the stenciled wall, the striped hallway, the chevron coffee table ... to much to mention.
Great job!
Kelly
your home is So fun and lovely! i love the colors- love the kids room! and their bathroom is awesome! i actually have a gallon of orange paint i plan to use in my kids bath somehow!
ReplyDeleteSince I am a HUGE AUBURN fan...you must know that I LOVE this house!!! You did an outstanding job on the makeover and I really like how thrifty you were. Come over on Monday and show it off at my Nifty Thrifty Tuesday party...hope to see ya there:)
ReplyDeleteBlessings,
Linda
Oh my goodness, you did an amazing job! ANd Im not just saying that, I'm totally in love with the orange and blue combo, I even have to orange feet (just painted a nightstand for my son this morning!). You have so many inspirational ideas al packed into one spot.
ReplyDeleteHow did the rental turn out? Did you get a family who will actually take care of it?
Jessica
stayathomeista.com
I live on $449.00 per month so thrift store and free and recycled decorating is all I can do for my home right now, thank you for some great ideas!!!http://fourfourtynine.blogspot.com/
ReplyDeleteTiffany, I am in love with your orange and blue palette in your home. I'm writing a feature for Yahoo! Real Estate on Color Trends and would love to feature a photo or two from this post? May I have your permission? I would definitely link back to your blog.
ReplyDeleteBrittany aka Pretty Handy Girl
Very cute and love it all! Saw the Auburn "finger"! WAR DAMN EAGLE!!!
ReplyDeleteLWC
so cute! what color orange is the dining room?
ReplyDeleteTiffany, Do you print your printables on regular paper, photo paper or some other kind of paper? I am interested in making a display for my kitchen and scattering a few throughout my house.
ReplyDeleteThe orange and blue Drake house is SO fun and cute! Thanks for sharing your great ideas.
I just print them on card stock- no particular brand.
DeleteCould you please share the name of the orange paint you used? I have several different samples of orange on my bathroom wall right now, and yours seems perfect!
ReplyDeleteHi--Love the stripes, how wide are they? I think they are perfect! Amazing creativity, thank you so much for sharing and inspiring!
ReplyDeletenike air max 97
ReplyDeletekobe 11
michael kors outlet
converse shoes
air max 270
kyrie 5 shoes
air max 95
supreme
lebron shoes
cheap jordans
Amazing Post, I really like your post. If any YouTube users need help regarding youtube.com/activate then they can contact us.
ReplyDelete